Boost your SALES IN REAL ESTATE from Online Web Application
You cannot ignore the digital marketing, especially when you are a real estate broker or dealer. With potential customers using the Internet to search their future purchase a strong and powerful digital marketing strategy helps real estate brokers and dealers to stand out in the competition.
The industry of real estate has expanded enough where buyers are doing an extensive search online before actually making their final purchase decision. The buyers are searching for brokers, dealers, projects, and sellers online which makes the digital marketing even more beneficial for the real estate industry.
Some of the advantages of digital marketing are:-
● Upload unlimited properties images/videos
● Upload 360-degree virtual tour
● Listings with photos and videos
● Get directly connected to the customers
● Real-time messaging
● Setup an appointment online
● Search engine with powerful filters
● 24/7 online presence
● Location awareness and maps
Why real estate application?
You can build your own brand and also build trust among the customers and get directly connected with your prospective customers.
What are the requirements?
One of the biggest reasons many people stay away from investing in an application is believing that it requires advanced technical knowledge and web design experience to build and manage an application. It's quite the contrary.
You don't need any experience to set up your own online application and start investing in digital real estate application get this complete property selling solution in your domain in just 1 DAY with just one click and set up your own brand.
There are options to buy or rent the websites.
In conclusion
Eventually, you will start building your brand and connects from the application. Then you can decide whether to sell your application for a profit or to continue to use it. The choice is yours!
I came across such Real estate application which is Online marketing solution to boost your sales.Cryptex Technologies has developed such an application and set up in your domain in just 1 Day.
For DEMO click: https://bit.ly/2BvdY5B
RabbitMQ with Ruby on Rails in 2018 for Web Application Development
An Introduction to RabbitMQ:
RabbitMQ is a message broker software where applications connect to the queue and transfer a message onto it.
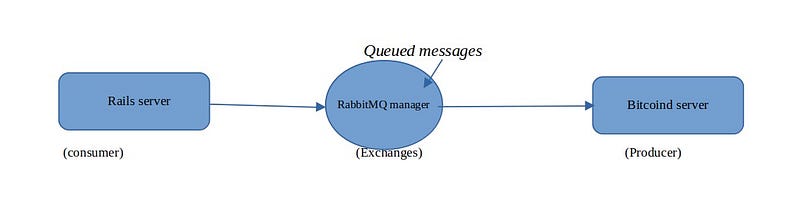
When one application server sends the request to another application server, RabbitMQ works as a queue manager where requests handled and served one by one.
Message transferring is done from one application to another through RabbitMQ. RabbitMQ uses the standard Advanced Message Queuing Protocol (AMQP) to keep message request in queues and serve easily. A message may contain any information like simple text transfer or task that need to process on another server.
This RabbitMQ software saves messages in the queue and
Why should we use RabbitMQ with Ruby on Rails?
Message broker works on the producer, broker
Queued messages will also use to send the messages or task to multiple
Let take
I have rails server running as producer and
Rails server send multiple
In that case, RabbitMQ can fulfill the role of load balancing and messages passing by keeping the request coming from rails server in
AMQP role in RabbitMQ:
AMQP store and forward messages to consumers, like same as SMTP protocol use to deliver mail to mailboxes
A virtual channel
How to use RabbitMQ in Rails application?
Using Bunny ruby RabbitMQ client, we can integrate RabbitMq with rails application.
There are some gems available to start with RabbitMQ in ruby like
gem “bunny”
Bunny help rails application to interoperate with
gem ‘amqp’
RabbitMQ installation commands in Ubuntu:
1] Step 1: Update system
sudo apt-get update
2] Step 2: Install Erlang
RabbitMQ is written in Erlang, you need to install Erlang before you can use it:
b] sudo dpkg -i esl-erlang_20.1-1\~ubuntu\~xenial_amd64.deb
3] Step 3: Install RabbitMQ
sudo apt-get install rabbitmq-server
4] Step 4: Start the Server:
sudo systemctl start rabbitmq-server.service
sudo systemctl enable rabbitmq-server.service
Thus if you are looking for web development services which are faster, reliable, redundant and scalable then you can definitely opt for Ruby on Rails RabbitMQ.
Ruby on Rails Action Cable Tutorial for Developing Real Time Web Application
Ruby Programming
Rails Application
Mobile App Development
Web App Development
Web Design
ror development
ror development tips
ruby development
ruby on rails
ruby gems
ruby on rails development
ruby on rails development tips
ruby on rails tutorial
ruby on rails voting system
ruby techblog
Action Cable
Rails 5.2.1 features
Action Cable is a powerful feature introduced in Rails 5. Using action cable one can develop real-time web applications. Action cable uses Web Sockets to create full duplex communication between application’s server and client.
Using action cable feature we can create any real-time functionality like live chatting, which updates chats, show new messages, notifications, etc without reloading of the page. Action cable basically keeps ruby on rails server data and client data updated using web sockets which make the application more feasible to use.
Action cable is not supported by RAILS VERSION > 5.
PREREQUISITES:
This ruby gem requires jQuery. If jQuery is not present in the project then simply add “jquery_rails” gem to gemfile.rb and redis-server in the system.
STEPS REQUIRED TO USE ACTION CABLE:
Add following in Gemfile.rb file :
gem 'redis', '~> 4.0'
Also add follwing in application.js file :
//= require rails-ujs
//= require jquery
//= require turbolinks
//= require_tree
Thats all about installation process.
Let’s see an EXAMPLE:
For creating Notification model, controller and views using scaffold command just run:
rails g scaffold Notification name:string
Then create a Channel , We call this channel “WebNotifications”.
rails generate channel WebNotifications
And we add some CoffeeScript files to show notifications to all users in javascripts/page.coffee:
App.room = App.cable.subscriptions.create "WebNotificationsChannel",received: (data) ->

$('#notification div').append '<li>' + data['notification'] + '</li>'

$('#notifications-count,.notifications-count').text data['count']
And finally we need to add the below code to the channels web_notifications_channel.rb:
class WebNotificationsChannel < ApplicationCable::Channel
  def subscribed
    stream_from "web_notifications_channel"
  end
  def unsubscribed
  end
end
Changes in notifications_controller.rb file To call the action cable:
   def create
            @notfication = Notfication.new(notfication_params)
             respond_to do |format|
          if @notfication.save
 format.html { redirect_to @notfication, notice: 'Notfication was                        successfully created.' }
 format.json { render :show, status: :created, location: @notfication }                          else
           format.html { render :new }
           format.json { render json: @notfication.errors, status: :unprocessable_entity }
        end
      end
    ActionCable.server.broadcast 'web_notifications_channel', notification: @notfication.name, count: Notification.all.count
 end
Changes in app/views/layouts/application.html.erb file:
I have added simple notification navigation in the application layouts.
<ul class="nav navbar-nav navbar-right">
  <li class="dropdown">
    <a href="#" class="dropdown-toggle" data-toggle="dropdown" role="button" aria-haspopup="true" aria-expanded="false">Notification (<b class="notifications-count">2</b>)</a>
    <ul class="dropdown-menu notify-drop">
      <div class="notify-drop-title">
        <div class="row">
          <div class="col-md-6 col-sm-6 col-xs-6">Notifications (<b id="notifications-count">2</b>)</div>
          <div class="col-md-6 col-sm-6 col-xs-6 text-right"><a href="" class="rIcon allRead" data-tooltip="tooltip" data-placement="bottom" title="tümü okundu."><i class="fa fa-dot-circle-o"></i></a></div>
        </div>
      </div>
      <!-- end notify title -->
      <!-- notify content -->
      <div class="drop-content" id="notification">
        <% Notfication.all.each do |notification| %>
          <li>
            <div class="col-md-3 col-sm-3 col-xs-3">
              <%= notification.name %>
            </div>
          </li>
        <% end %>
      </div>
    </ul>
  </li>
</ul>
We need to do simple configuration setup in the cable.yml file.
redis: &redis
adapter: redis
url: redis://localhost:6379/1

production: *redis
development: *redis
test: *redis
To start the application first we need to start the redis-server the command to start the redis-server is:
redis-server
The Redis-server will be started then you can serve your application.
Creating new Notifications:

The result will be shown like that By using the action cable it will update the Notification to all live users.

A web app development using Ruby on Rails in 2018 is quite fast and reliable because of it's new releases in Rails 5.2.1. We have discussed Action Cable which is helping RoR developers to show the live notifications to all users. These notifications can be of any type like Messaging, Sending push notification etc.
What is Automated Software Testing and When Choose Automation Over Manual Testing?
As software testing is moving from manual into automation at very fast speed, at times testers get into a scenario where they need to opt what needs to be automated, when to automate and why to opt for automated software testing?
If you are a software tester, this blog will help you to choose one from the two testing methods.
Software testers generally perform manual testing in the following scenarios:
1. When an application is at the initial stage of development. As application flow and feel and change over developing period it's better to go for manual testing then automating it. Automation can be done only when the application is stable.
2. When negative testing of the application is to be done because it's more reliable to depend on manual testing.
3. When regression is not required multiple times i.e. there are no multiple executions of test cases.
4. When there are some functionalities which cannot be automated like Captcha.
What is Automated Software Testing?
It is a process in which specific tools are used to execute scripts or test and compare the results. There are various tools available in the market to automate different types of software testing like QTP, Selenium, etc.
Starting with automation first need to take in consideration the following to avoid any confusion.
-
Is the build stable?
-
Does the application requires testing same functionality many times(Regression/Sanity/Smoke)
-
Will writing automated test case save time?
-
Do we have that much time to invest in automated testing?
If the answer to this question is YES then you can opt for automation testing for the application. Choosing the right framework for application is all dependent on what you are going to test.
And yes a team of experts for software testing to carry out the process is really important aspect followed by proper planning and strategy.
When to Choose Automated Software Testing?
1. Regression Testing: When we need to test the same test case or functionality multiple times. As testing the same functionality manually make people bore and error chances increase.
2. Large No. of Test Cases: When there is a large number of test cases to execute, it’s better to go with automation where just running the test suite will solve the problem.
3. Time management: As said above executing a large number of test cases manually will take a lot of time and money. So the time can be saved if we are using automation testing.
4. Performance: It's not possible to invest thousands of users to test the performance of any application. Automated testing can generate the required amount of user to interact with application and network.
5. Accuracy: It can be obtained with the help of regression/sanity/smoke testing: one has to just run the script. Manually there is a chance of missing any scenario.
Nine Array Methods in Ruby Programming and their Differences - You Should Know About!
Nowadays, data handling is a big responsibility for every web and mobile application. Arrays make the process easier and it can handle any list of data. Once you have data in an array, you can easily sort it, remove duplicates, change its order to either ascending or descending and many more.
In Ruby programming, there are many methods for Array object i.e. Map, Collect, Select, Reject, Each, Inject, Reduce, Detect and Find. Most of the Ruby on Rails developers uses these methods in their web applications.
In this blog, we have outlined the difference between all the methods.
Let’s have a look at them to choose the one which is best suitable for your requirement.
1. Map
The map method takes each element from the array and evaluates
given block on it. Output will be in the form of an array containing evaluated results without changing the original array.

2. Map!
If you want to modify the original array by replacing the output array elements with the original array elements then you can use the map! method.

3. Collect
There is no difference between collect and map method both methods work same. Similarly map! and collect! methods are also same.

4. Select
The select method takes each element from the array and evaluates given block on it. If block or statement evaluates to true the original elements gets added into the output array. In this case output array and original array are different. If you want to replace the original array to the output array, you can use select! Method.

5. Reject
The reject method is exactly opposite to the select method. It will take each element of the array in the block to evaluate. The output array will consist of all the elements in the original array for which block evaluates to false. The reject! method is also opposite to the select! method.

6. Each
The each method will iterate over array taking each element from it for evaluation. It will return the original array, but not evaluated one. Now, it depends on you what kind of operation you want to perform in the block.

7. Inject
The inject method takes two arguments, one as an accumulator and other as each element in the array. Accumulator accumulates the evaluated values. This returns the final value of the accumulator as a result. The initial value of the accumulator can be defined if not define it takes the first element of the array as initial value.

8. Reduce
Reduce method is similar to the inject method.

9. Detect
The detect method is similar to the select method, but the only difference is its output. The detect method also evaluates a block for each element of the array, but returns the first element in the array for which the block evaluates to true or statement in the block evaluates to true.

10. Find
Find method is similar to Detect method.

Token Based Authentication API in Rails with the help of JWT and Knock
If you want to create Rails Application dependent on API only and you have a requirement to provide Token based authentication in your application. So you can use JWT+ KNOCK token based Authentication solution.
Knock is an authentication solution for Rails API-only application based on JSON Web Tokens.
JWT is JSON based web tokens.
Advantages of using JWT and Knock in Ruby on Rails Application:
-
JWT:
1. It is lightweight
2. It is easy to use
3. It is stateless
-
Knock:
1. Seamless JWT authentication for Rails API
2. It is easy to implement and maintain.
3. It allows customization.
Step 1: Create Rails API Project
rails new project_name --api -d mysql
where
# --api specifies the rails application is API based
# -d mysql specifies that we use mysql database in this application
Step 2 : Add gem
Add following gem into project_name/Gemfile
gem 'knock'

gem 'jwt'
gem file looks like

Figure 1: Gemfile for JWT and Knock
Next to run command on terminal for installing gem in application.
bundle install
Step 3. Setup a basic Knock structure.
Run following command
rails generate knock:install

rails generate knock:token_controller user
Now run the following commands to setup your Rails application.
rails generate model users

rails generate controller users

rails generate controller home
If you add custom model so you can do it
File Location: project_name/db/migrate/:random_number_create_users.rb

Figure 2: Migration File
Run following command to create User table
rake db:migrate
Step 4 . Authorization/Knock Setup:
File Location: project_name/config/initializers/knock.rb

Figure 3: Knock.rb file
Step 5. Setup your User model with some basic validation.
File Location: project_name/app/model/user.rb
Your user model look like this.

Figure 4: User.rb file
Now you can setup controller to access the Authentication.
Add include Knock::Authenticable
File Location: project_name/app/controller/application_controller.rb

Figure 4: Application Controller
Also each and every method call pass though knock authentication.
Add before_action :authentication_user, only[:auth]
Here auth is a method to check client is authorized.
In home controller there is index method and auth method for login.
File Location: project_name/app/controller/api/v1/home_controller.rb

Figure 6: Home Controller
File Location: project_name/app/controller/api/v1/users_controller.rb
In user controller there is index, current method for current user data and create method for creating new user. Also you can add update and delete method.
Add authentication on required method with help of authentication_user , authorize_as_admin, and authorize method.

Figure 7: User Controller
Final Step: Test API
We test API with help of Postman.
1. User creation API: API endpoint is http://localhost:3000/api/v1/users/create
We send parameter in body for user creation so that API method type POST. After calling API we get successful response with status 200 and and message “User was created ”.
After user creation we go to login API, but for application login we need a token so we need to call token API.
rails new project_name --api -d mysql

Figure 8: User create API
2. API Endpoint: http://localhost:3000/api/v1/user_token
For user token we need to send email id and password in body of method type POST.
If email id and password is valid to API we get jwt token from knock in response.
Great we now got token. With help of this we access knock authorized method.

Figure 9: User_token API
3. Login API:
API Endpoint: http://localhost:3000/api/vi1/auth
we sent jwt token in header of API and content type is applicationJson.
Authentication: Bearer jwt token
content type: : applicationJson.
If everything is OK, then we get successful response.

Figure 10: Login with jwt token
These two gems Knock + JWT can help us to develop token based API in Rails 5 very easily and will save the overall time required in Ruby on Rails development.
Unit Testing Significance in Ruby on Rails Software Development
In this blog we will discuss about Unit Testing, the very first thing that we need to know is when the Unit Testing is being performed. Unit testing is the initial level of software testing, that is performed on the application source code mainly by the developer. The main motive of Unit Testing is to isolate a section of code and verify it’s correctness.
What is Unit Testing:
A level of software testing where the individual units or components of a software or web applications are tested by developer is called Unit Testing. It is an important aspect of Software Testing. It is a component of test-driven development (TDD).
Benefits of Unit Testing:
1. Defects revealed by a unit test are easy to locate and relatively easy to repair. Unit testing verifies the accuracy of each unit.
2. In unit testing procedure – the developer needs to write test cases for all functions and methods so that whenever a change is required, it can be fixed quickly in later date and the module also works correctly.
3. Unit testing improves the quality of the code. It helps the programmer to write the better code. It identifies every defect that may have come up before code is sent further for regression testing.
4. If a test fails, then only the latest changes need to be made in the code and need to debug. So It’s better to say unit testing helps to simplify the debugging process.
5. Codes are more reusable. In order to make unit testing possible, codes need to be modular. This means that codes are easier to reuse.

Gems to perform Unit Testing in your Ruby on Rails web application:
There are several gems available in Ruby on Rails application framework to perform the unit testing.
-
rspec_rails: Rspec is an automated test case, used to test the code written by developer while creating the application.
-
factory_girl_rails: create dummy data while performing testing.
-
minitest: It is also used to perform the unit testing in your rails application.
These 3 gems given above are used for Test Driven Development (TDD) environment.
-
database cleaner: Used to cleanup the database in Ruby while testing.
Most of the Ruby on Rails Developers use the best practices for carrying unit testing on individual units of source code or program modules.
Unit Test Case Best Practices:
-
You Should always follow the proper naming conventions for your unit testing, i.e. clear and consistent naming conventions for the unit tests.
-
If any changes done in the requirements then your unit test case should not be affected. Your test cases should be independent.
-
Always follow “test as your code" approach. The more code you write without testing, the more paths you have to check for errors.
-
If any changes needs to done in the code for the corresponding module, make sure that you have the unit test case for that particular module and need to pass the test case before any implementation done.
Conclusion:
Developer should make Unit testing a part of their regime to make neat and clean, reusable, and bug free codes. Also by using unit testing the quality of code will be improved. Unit testing helps to reduce the cost of bug fixes.